Showing posts with label Technique. Show all posts

Saturday, September 29, 2012

Serene


I love the way this card turned out. I was inspired by a card that my upline Dawn did with a different set at a past demo shoebox meeting.  I cut out a shape from the Apothecary framelits and then layered it on my Whisper White card base and sponged Baja Breeze and Lucky Limeade inks within the shape. I removed the shape and then embossed the serene silhouette image over the inked background. Mounted it onto the basic black card stock and then the baja breeze card base. Added a sentiment and a pearl with a punched circle to complete the card.


Thanks for stopping by. Leave a comment, I'd love to hear from you!
To place an order, please contact me or order on my online webstore.
Keep Creating,
Barbara Pisciotto
Stampin' Up! Demonstrator and Paper Craft Instructor

Monday, September 24, 2012

Triple stamping, triple the fun!

Here is a card we created at the card buffet.  I love this triple stamping technique. So quick and simple to make.

You layer the 3 whisper white card stocks, just use very little adhesive as you'll need to separate them after you stamp.  Stamp your images, separate the whisper white images and adhere to your card base, and the 2 card mats.  Add your sentiment and your card is complete!


Thanks for stopping by. Leave a comment, I'd love to hear from you!
To place an order, please contact me or order on my online webstore.
Keep Creating,
Barbara Pisciotto
Stampin' Up! Demonstrator and Paper Craft Instructor

Friday, September 21, 2012

Happy Birthday!

I saw a similar card like this floating around blog world but don't remember where I saw it.  I went off of memory to create this fun card. I love polka dots so I think it fits in perfect with this card.  Very simple but stepped up with black embossing powder, glimmer brads, and the Apothecary Accents framelits.  The stamp set is You're Amazing.

 
Thanks for stopping by. Leave a comment, I'd love to hear from you!
To place an order, please contact me or order on my online webstore.
Keep Creating,
Barbara Pisciotto
Stampin' Up! Demonstrator and Paper Craft Instructor

Tuesday, May 31, 2011

Vintage Card

I created this card awhile back. I don't think I ever posted it.  Shabby Chic is not normally my style but I love how this turned out. I embossed medallion stamp with white embossing powder. Crunched, inked and tore the DSP then layered onto layers of card stock.

Thanks for stopping by!

Barbara Pisciotto

Sunday, March 27, 2011

Bliss

Here is a card we made a my Shabby Chic/Vintage class.  The black card stock uses the faux suede technique.  Basically, you separate your two layers of card stock to get the faux suede look.  I used the Bliss stamp set, available for FREE until March 31 in the Sale-A-Bration brochure.  If you'd like to place an order please contact me.


Have a great day!

Barbara Pisciotto

Tuesday, March 15, 2011

Sponging In MDS

Today I have a scrapbook layout that I created in My Digital Studio {MDS}.  Have I told you that I {Heart} My Digital Studio!  It is such a great program and I'm learning so much.  The other day I learned a technique from Leah Fedynak on the MDS website, www.mydigitalstudio.net.  Click here for the tutorial. If you have not checked out Stampin' Ups! MDS website go there now!  Anyone can sign up to join the community, it's FREE and has a ton of inspiration, ideas, tips, tricks and much more!


I love these pictures of my girls.  They look so sweet and cute. Now they are growing into beautiful young ladies. [well sometimes not acting like young ladies, lol]

If you would like to learn more about My Digital Studio check out the website and contact me to order your software today! You can earn a free Sale-A-Bration stamp set or more with every $50 you spend through March 31. I'd be glad to meet with you to teach you more about MDS!

Have a great day!
Barbara Pisciotto

Saturday, February 19, 2011

Rock On!

I belong to a Bunco group of 12 ladies. Each month we get together and have a ton of fun playing Bunco. We each have a month to host. February was my month and I had my theme already picked out back in November!  Actually my daughter, Sera, came up with it.  Both my daughters and I love American Idol and started watching it in season 8, so were a little behind, LOL!

So you guess it, American Idol was our theme.  I covered 5 x 7 note pads to give to each guest, personalized with their name. Bunco was a blast as always.  When someone got a Bunco they were to stand a sing a few lines of a song.  I think the ladies all enjoyed themselves.


Have a great day!

Friday, January 21, 2011

Love Card

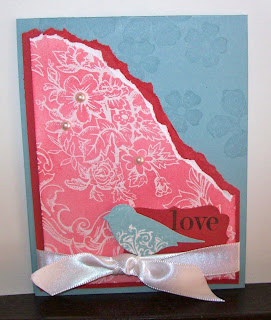
I made this card for my friend's daughter's wedding shower.  I used Baja Breeze, Ridinghood Red, and rubbed Ridinghood Red on our Presto Patterns DSP.  I love these colors together and got the combo off of our color coach. The colored the "Love" with a basic black marker from Things I Love stamp set and stamped flowers in versamark ink using the Vintage Vogue stamp set. The bird is from Punch Potpourri. Added some pearls and ribbon and there you have it.  I think the card is much better in person than the picture.


Hope you get to create something fun today!

Barbara Pisciotto

Tuesday, December 14, 2010

Embossed & Shine for Christmas

Here is one of the Christmas cards we made at stamp camp.  Yes I broke out the silver embossing powder for this beautiful tree stamped with the Snow Swirled stamp set. Thanks to my stamping friend/upline Dawn for borrowing it to me!  We also embossed the card with the Northern Flurry  textured embossing folder by running it through the Big Shot!  Add some sparkle with our rhinestones and there you have it.  The card stock is Rich Razzleberry.


I'll be back tomorrow with more Christmas cards!  Hopefully I'll get my cards out in the mail on time this year, lol!  Have a great day!

To place an online order with me, please click on the shopping cart image in the right sidebar of my blog or contact me directly at inkitupetc@sbcglobal.net Thanks! Keep Stampin' Barbara Pisciotto

Saturday, January 2, 2010

Wedding Card with a Water Color Technique

I created this card for a friend who was married back in October. I'm ashamed to admit it but I was very very very late on sending this card since we were not able to attend the wedding. What is extra special about this card is that my 10 year old daughter, Nina, helped me make this card. The friend was her teacher from 1st & 2nd grade and we've been very blessed to have her in our daughter's life & be able to stay in contact! So that called for an extra special card!

I taught my daughter, Nina, a water color technique on the rose. You use shimmery white card stock, re-inkers, white stampin emboss powder & lots of water! We also used the Big Shot to add texture to the background on pretty in pink card stock. To add a special touch of embellishment we used the pearls & beads on a hat pin from the SU Pretties Kit. The stamps used is Fifth Avenue Floral and a retired wedding stamp set for the wording that I can't remember the name.

To place an online order with me, please click on the shopping cart image in the right sidebar.

Thanks!

Keep Stampin'

Barbara Pisciotto

Monday, March 16, 2009

Just Faux You!


Here is another card part of my techniques class this weekend. It is Faux Linen. I really like how this turned out!

Supplies: Stamps: Inspired By Nature, Dreams Du Jour, Card Stock: Riding Hood Red, Pink Pirouette, Glossy White, Ink: Kiwi Kiss, Pink Pirouette, Riding Hood Red, Stampin' Markers: Old Olive, Summer Sun, Chocolate Chip, Access: Daubers, 1-3/4" circle punch, Chocolate 5/8" Grosgrain Ribbon, Dimensionals

Just going with the faux!


I know I've been really bad about posting but hey that's life & I'm just going with the faux. Literally! I'm having a technique class this Saturday and I finished my samples, wooo hooo! I decided to concentrate on four faux techniques. I've never done any of the four myself so this was a lot of fun to do. Here is one of the cards. I'll have the rest posted during the week.


This is Faux Tile. If you look closely you can see I messed up on my scores. Normally I would do it over again but I'm trying not to be so "perfect" it's a big struggle of mine. I figured if I tell the ladies don't worry about making a mistake, I guess that goes for me too!


Supplies: Stamps: Embrace Life, Card Stock: Regal Rose, Sahara Sand, Rose Red, Very Vanilla, Ink: Close to Cocoa, Old Olive, Rose Red, Accessories: Curly Label punch, oval punch, Top Note Big Shot Die, Olive ribbon, sponges, dimensionals.

Sunday, March 16, 2008

Polka Dots Meets Pretties Flower

Here is a super easy card we did at my last stamp camp. We stamped on the big flower from the "Pretties Kit" with classic ink. This is one very simple, fast way of dressing up the flower.

Supplies: Stamps: Polka Dots & Paisley, Card Stock: Regal Rose, Bashful Blue, Whisper White, Certainly Celery, DSP: Bali Breeze, Ink: Rose Red, Access: Ticket Corner Punch, Key Tag punch, 1/8" circle punch, 1-3/8" Circle punch, Build A Brad, Dimensionals, Dauber

Thanks for looking. Have a great day!

Wednesday, March 12, 2008

Friendship Blooms

Here is a card we did at my Hostess Club camp. We used rub ons and a technique called: Faux Silk found on SCS. Basically you stamp your images onto tissue paper. Have the tissue paper larger than the finished size. If using an outline image then color with markers. Note they will bleed some. Crumple up the tissue paper. Using your glue stick, spread glue all over your whisper white card stock. Then open up your tissue paper & spread the tissue paper over your card stock, carefully smoothing out most of the wrinkles. Then cut the excess tissue paper around your card stock. Finish up your card. I like the texture it gives to your image. I used a trifold layout for this card, 4-1/4 x 11, scored at 3-1/2 & 9

All supplies Stampin' Up!: Stamps: Friendship Blooms, [SAB], Card stock: Rose Red, Basic Black, Whisper White, Pumpkin Pie, Ink:Old Olive, Pumpkin Pie, Rose Red, Access: Key Tag & Large Oval punch, Love & Happiness rub-ons [SAB]

Saturday, October 6, 2007

Reflection Tech

Here is a technique that I've been wanting to try, "Reflection Technique" I learned it from Beate's blog/Splitcoast. It is really simple. Still need to improve on the background but other than that, I thought it turned out well.

I'm giving the card to my girlfriend's son who is turing 1 years old. Happy Birthday Frankie!
Here is the link to the find a tutorial for this technique:
Here is Beate's Blog, you must check it out, she is super talented!
Stamps: Monkey Business & Eat Cake
CS: Always Artichoke, Choc Chip, Very Vanilla
DP: Outlaw
Ink: Choc Chip, Mellow Moss
Acc: Small Oval punch, Ticket Corner punch, Aqua Painter, Dauber
Have fun creating!


Saturday, May 19, 2007

"Pop-Up" Polka Dot & Paisley Card

OK, I know I'm addicted to both this SU stamp set and the paper. I love it. I hope it is in the new catty coming out in July! See below for supplies and instructions.


Supplies~ Stamps: Polka Dots & Paisley, Cardstock: Taken With Teal, Whisper White, Designer Paper: Petals & Paisleys, Ink: Old Olive, Rose Red, Take With Teal, brads, ribbon and staple. This card is a pop up card.


Pop-Up Card
Instructions from Stampin’ Up! © Stampin’ Success ® December 2006 Issue.


Base cardstock: 8 ½” x 5 ½” fold in half
Inside cardstock [lining]: 8 ¼” x 5 ¼” folded in half

1. Unfold the inside CS and lay flat.
2. On the lining, make a light pencil mark on the center crease 2” from the top edge. [point 1]
3. Make two additional marks along the top edge of your cardstock at 1 ½” on either side of the crease. [point 2 & point 3]
4. Fold the lining CS in half so the pencil marks are on the outside and score a straight line from point 1 to point 2 and point 1 to point 3. Creating a “V”
5. Place the folded lining CS on the card so that it opens toward you with the “V” on your right.
6. Tuck the “V” inside the lining by folding it at the center crease and score lines.
7. Adhere the lining inside your card so that the “V” pops up at the top.
8. Stamp image for your pop up and adhere to the left side of the “V”

Monday, May 14, 2007

Polka Dots & Paisley Card


This card was made using a technique called Chalkboard Pastels. Stamp your image onto a dark color CS with Whisper White Craft ink. Then with a sponge, dauber or cotton ball apply Stampin' Pastels to the stamped images. This makes the images "pop" off the dark CS similar to chalk on chalkboard.
Supplies~Cardstock: Cool Caribbean, Basic Black, Certainly Celery, Whisper White, Stamps: Polka Dots & Paisley, Stampin' Write Markers: Rose Red, Old Olive, Tempting Turquoise, Stampin' Pastels: various colors, Ribbon: Spring Moss.

Saturday, April 7, 2007

Baby Boy Card

I made this for a friend who had her 2nd baby. Supplies: Brocade Blue, Certainly Celery & Confetti White CS, Wash Day jumbo wheel, Every Day Flexible Phrases, Stampin' Write Makers [various colors]. I used the Slit Punch to form the scallop. See Punch Me! technique for details.

Scallops Made Easy

I'm becoming obsessed with punches! I found this on SCS using the Slit punch and Corner Rounder punch to create scallops. I love getting more than one use out of a product and more for my $$!!!


Slit Punch [top scallop sample]:
Turn punch upside down and insert cardstock. Line up cs with edge of punch and punch. Move your punch over and line up the beginning of your second scallop with the end of the last scallop, punch again. Continue to desired length.


Corner Rounder Punch [bottom scallop sample]:
Turn your punch upside down and take the guard off the punch. [see photo] Keep punch upside down and insert cardstock. Link up cs with edge of punch and punch. Move your punch over and line up the beginning of your second scallop with the end of the last scallop, punch again. Continue to desired length. Don't forget to put your guard back on when done!

Have fun!

Sunday, January 14, 2007

Heat Embossing Technique

Supplies:
Powder Pal or large piece of scratch paper.
Embossing Buddy [optional]
VersaMark or Craft Ink
Embossing Powder
Heat Tool
Card stock & stamp images of your choice

1. Place your card stock in a Powder Pal tray or over a large piece of scratch paper.
2. Rub the Embossing Buddy across the card stock you want to emboss. This keeps the embossing powder from sticking anywhere but on the ink. [optional]
3. Stamp the image with VersaMark or Craft ink.
4. Pour powder onto the inked image, making sure that the image is coated completely.
5. Shake excess powder off into the tray or your scratch paper and funnel it back into the container.
6. Heat the stamped image only until the powder changes to a shiny liquid and rises.
7. Allow embossed image to cool.

FYI: be careful not to heat the powder too long, as it will actually melt into the paper and paper may be scorched. Allow to cool for a short period of time before touching.

Stampin' Emboss Powder
Individual Colors: Black, classy Copper, Crystal Clear, Gold Glory, Hologram Highlights, Iridescent Ice, Sterling Silver, Winter White, Vanilla, Glassy Glaze Enamel. Pg. 228/229, $4.50 each.

Embossing Stack Assortment: Brights-Red, Green, Orange, Pink. Earths-Maize, Olive, Rust, Dark Brown. Regals- Burgundy, Forest Green, Blue, Navy. Subtles- Light Blue, Light Pink, Lavender, Sage. Pg 228, $16.95 per stack of 4.